How to create a zero-shot learning text classifier using Hugging Face & Streamlit!
- Charly Wargnier
- Apr 28, 2022
- 7 min read

Updated: May 15, 2022
Hey Streamliters!
Today I'm excited to have the opportunity to contribute to the 30DaysofStreamlit challenge via this hands-on tutorial! 🎈
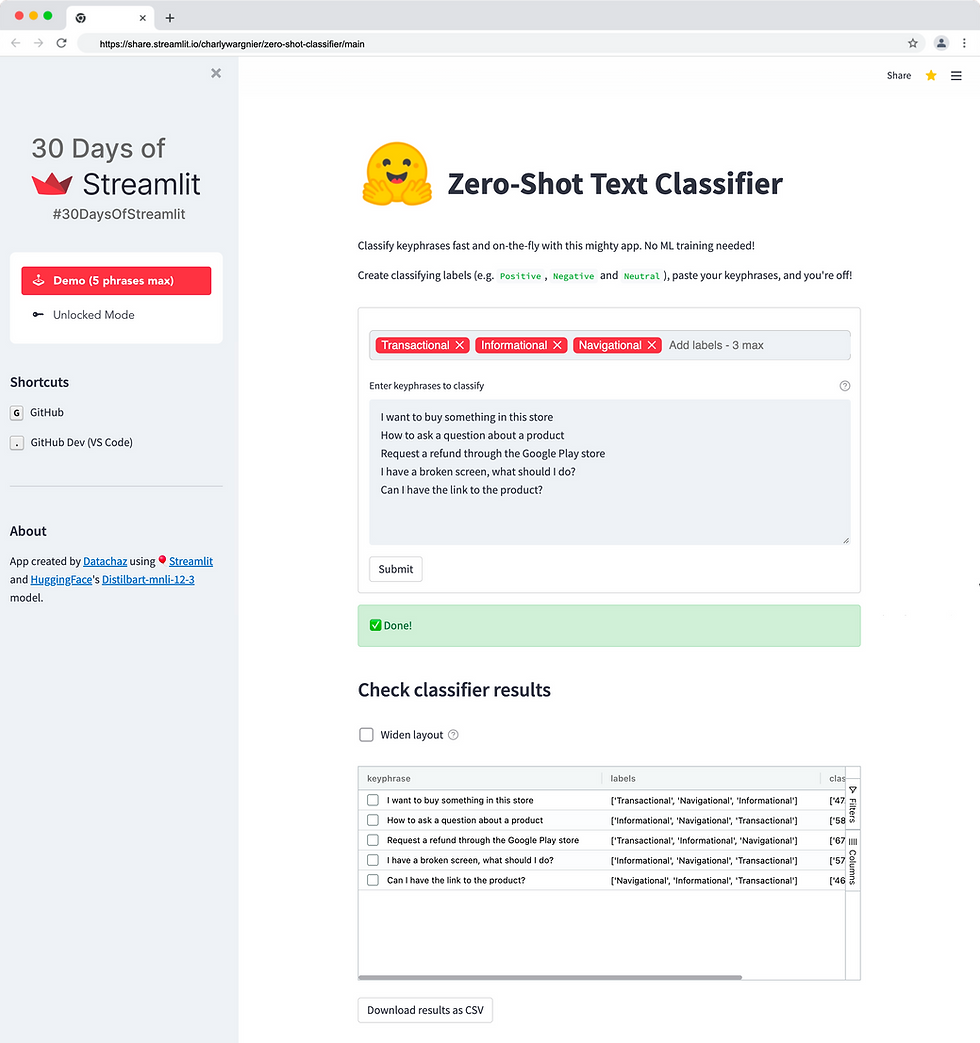
What are we building?
We will create a zero-shot learning text classifier using Hugging Face's API inference and Distilbart!
With it you will have the mighty power to classify keyphrases on-the-fly, fast, and without any ML training!
You can set these labels dynamically to anything, e.g.:
'Positive', 'Negative' and 'Neutral' for sentiment analysis
'Angry', 'Happy', 'Emotional' for emotion analysis
'Navigational', 'Transactional', 'Informational' for intent classification purposes
Your product range (bags, shoes, boots etc.)
You decide!
Excited? Let's dive in!
A quick word about Zero-shot learning
Zero-shot learning (ZSL) differs from traditional machine learning methods as it deals with the ability to recognise objects *without* any training samples.
Yet it can build and train models efficiently with the help of transferring intelligence from previously seen categories and auxiliary information. If you want to learn more about ZSL, you can read more here.
Today we will be using ZSL via the excellent HuggingFace API Inference API.
There are many benefits of leveraging the HuggingFace inference API:
You can access 20,000+ state-of-the-art Transformer models via a simple API call!
You can also run extensive models (CPU or GPU!) without worrying about RAM limitations, always guaranteeing a smooth deployment to production.
The Hugging Face API inference has a generous free allowance, with up to 30k input characters per month.
Shall you need to go above that 30K limit? You can pick up the Pro plan.
So head off here to copy and paste your API token. We will need it later.
Many great zero-shot models are available in the HuggingFace hub, yet let's pick Distilbart-mnli-12-3 as I've had good results with it.
That preamble done, let's get started by installing Virtual Environment!
Installing a Virtual Environment
Regardless of the package management tool you use, working in a virtual environment is always good. That way, the dependencies created for a given project do not impact any other projects you're working on.
I use Conda, but you can use PipEnv, Poetry, Venv or VirtualEnv.
Let's create a new Conda environment with Python 3.7. and call our environment zero_shot:
conda create -n zero_shot python=3.7
Typing the following command will activate the environment:
conda activate zero_shot
You can exit from the Conda environment via the following command:
conda deactivate
We can now manually install the libraries we need for this app to work. For installing multiple packages on the command line, pass them as a space-delimited list, as follows:
pip install streamlit streamlit-option-menu requests
streamlit-tags streamlit-aggrid
Importing the Python libraries
After installing the needed libraries into your virtual environment, we need to import them in an empty Python file that we will call streamlit_app.py:
import streamlit as st
import pandas as pd

# Import for API calls
import requests

# Import for navbar
from streamlit_option_menu import option_menu

# Import for dynamic tagging
from streamlit_tags import st_tags, st_tags_sidebar

# Imports for aggrid
from st_aggrid import AgGrid
from st_aggrid.grid_options_builder import GridOptionsBuilder
from st_aggrid.shared import JsCode
from st_aggrid import GridUpdateMode, DataReturnMode

# Import for loading interactive keyboard shortcuts into the app
from dashboard_utils.gui import keyboard_to_url
from dashboard_utils.gui import load_keyboard_class
Adding a title tag, a favicon, and a logo
This can easily be done via 'st.set_page_config()':
st.set_page_config(layout=layout, page_title="Zero-Shot Text Classifier", page_icon="🤗")
Note that it must be located a the top of your Python file, just after the imports mentioned above and before any streamlit function or widgets. Doing otherwise will throw an error.
Now let's add a logo and a title at the top of the app:

The logo, as an image, can be added via the st. Image widget, as follows:
st.image("logo.png", width=350)
You can modify the image width via the 'width' parameter. Also, make sure that your image is located in the root folder of your repository.
Adding the title is as simple as:
st.title("Zero-Shot Text Classifier")
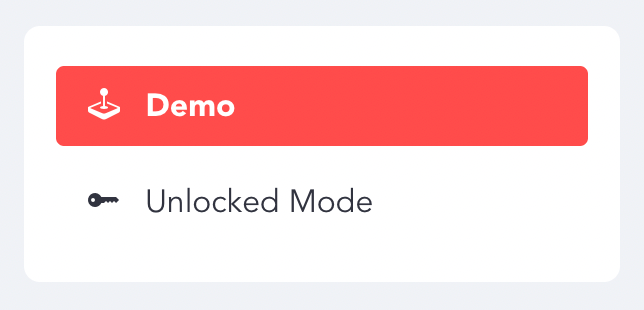
Creating a muti mode application
Let's create a muti mode application with:
A free demo mode where users can classify up to 5 keyphrases per API call (using my HuggingFace API key).
An unlocked model where users can use their API key to classify up to 50 keyphrases per call
I've kept the unlocked limit to '50' because I want to preserve performance while users experimented with this demo.
Of course, you folks can scale and fully unlock it! To do so, fork this repo and tweak 'MAX_LINES_FULL' in the code.
Adding a navigation panel
To add a navigation menu, we're going to use the ace Streamlit-option-menu component!
Here's the code snippet to add it to the app:
with st.sidebar:
    selected = option_menu(
        "",
        ["Demo", "Unlocked Mode"],
        icons=["bi-joystick", "bi-key-fill"],
        menu_icon="",
        default_index=0,
    )
As you can see, there are two pages/modes, 'Demo' and 'Unlocked Mode':
The code for the Demo page needs to be wrapped in the following 'if statement':
if selected == "Demo":
    # ADD CODE FOR DEMO HERE
Similarly, the code for the 'Unlocked Mode' needs to be wrapped as follows:
elif selected == "Unlocked Mode":
	# ADD CODE FOR 'Unlocked Mode' HERE
Note that both code snippets are identical. The only difference is that you will need to add an 'st.text_input' widget in the 'Unlocked Mode' code snippet so users can add their API token:

Now let's dive into the code snippets we need to add in these if statements! :)
Storing your HuggingFace API key via st. secrets
Before creating our API call, we'd need to store our Hugging Face API key anonymously. Since version 0.78.0, you can manage your secrets in Streamlit Cloud to securely connect to private API keys. Data sources etc.
You can also add your secrets in a TOML file when testing your application locally. For example:
# Everything in this section will be available as an environment variable

API_TOKEN = "62697577-XXXXXXX-1b3d319fccf4"
Check out the Streamlit documentation for more details.
Back to the 'Streamlit_app.py' file, you can declare 'API_TOKEN' in the api_token variable as follows:
api_token = st.secrets["API_TOKEN"]
Calling the HuggingFace Inference API
Now that you've added your API token via 'st.secrets', You can call the distilbart-mnli-12-3 model in a few lines!
API_KEY = st.secrets["API_KEY"]

API_URL = (
        "https://api-inference.huggingface.co/models/valhalla/distilbart-mnli-12-3"
    )

headers = {"Authorization": f"Bearer {API_KEY}"}
Setting up the label widget
By the way, this widget is not your usual multi-select widget!

It's a component called 'Streamlit Tags' from the talented Gagan Bhatia!
Besides an auto-complete functionality, what makes it mighty is that it can add your values. On. The. Fly! Here's the code:
        label_widget = st_tags(
            label="",
            text="Add labels - 3 max",
            value=["Transactional", "Informational"],
            suggestions=[
                "Navigational",
                "Transactional",
                "Informational",
                "Positive",
                "Negative",
                "Neutral",
            ],
            maxtags=3,
        )
Creating a text area to classify keyphrases
Now we need a text area to enter the keyphrases we want to categorise:
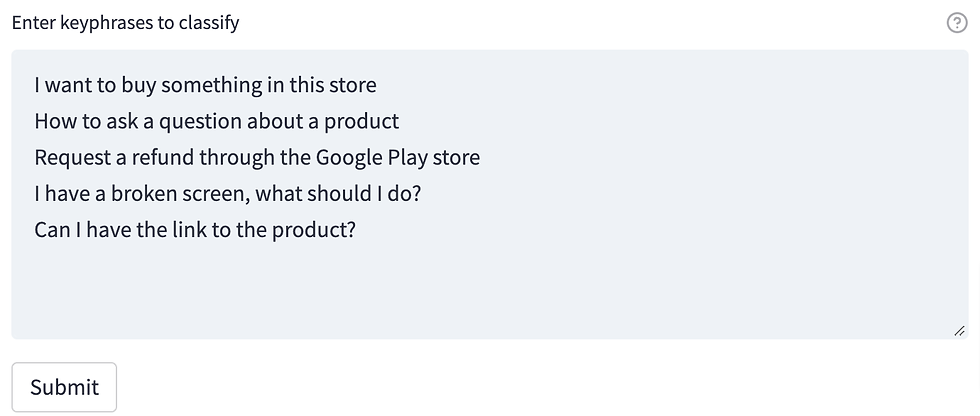
We can create it via the 'st.text_area' widget:
    MAX_LINES = 5
text = st.text_area(
            "Enter keyphrase to classify",
            sample,
            height=200,
            key="2",
            help="At least two keyphrases for the classifier to work, one per line, "
            + str(MAX_LINES)
            + " keyphrases max as part of the demo",
        )
lines = text.split("\n")  # A list of lines
linesList = []
for x in lines:
    linesList.append(x)
linesList = list(dict.fromkeys(linesList))  # Remove dupes
linesList = list(filter(None, linesList))  # Remove empty


if len(linesList) > MAX_LINES:


    st.info(
        f"🚨 Only the first "
        + str(MAX_LINES)
        + " keyprases will be reviewed. Unlock that limit by switching to 'Unlocked Mode'"
    )
Creating the API payload
Now let's create a Python function called 'query(payload)' that will contain our data pack:
def query(payload):
    response = requests.post(API_URL, headers=headers, json=payload)
    # Unhash to check status codes from the API response
    # st.write(response.status_code)
    return response.json()
Now here comes the exciting part, we can loop this API call through our list of key phrases!
First by creating an empty list:
listToAppend = []
Then by creating a for loop that will iterate through our list:
for row in linesList:
    output2 = query(
                {
                    "inputs": row,
                    "parameters": {"candidate_labels": label_widget},
                    "options": {"wait_for_model": True},
                }
            )
Notice the 'wait_for_model' field set to 'True'
Without it, it would at times trigger a 503 error in your app. The error is triggered because the model is not always available, and the model was loading.
Thanks to the one and only Omar Sanseviero for that tip! More details here.
Now let's add our results to our list via the '.append' method:
listToAppend.append(output2)
We would need the classification results to be printed neatly in a data frame:
df = pd.DataFrame.from_dict(listToAppend)
Print the output to your Streamlit app simply by calling:
df
Convert the data frame to a dynamic table via streamlit-ag-grid
Let's make things a bit more interesting by plugging in Streamlit ag-grid, A Streamlit wrapper built by Pablo Fonseca on top of AG-Grid, a highly customisable JavaScript data grid!
AG grid significantly improves Streamlit's capabilities in displaying data frames and interacting with them.
Here are some of the AgGrid features:
Sort, filter and search columns
Drag columns + change their order
Group columns, pin them and compute aggregations
Large dataframes can also be paginated
Let's have a look at the code:
gb = GridOptionsBuilder.from_dataframe(df)
# enables pivoting on all columns, however i'd need to change ag grid to allow export of pivoted/grouped data, however it select/filters groups
gb.configure_default_column(
    enablePivot=True, enableValue=True, enableRowGroup=True
)
gb.configure_selection(selection_mode="multiple", use_checkbox=True)
gb.configure_side_bar()  # side_bar is clearly a typo :) should by sidebar
gridOptions = gb.build()

response = AgGrid(
    df,
    gridOptions=gridOptions,
    enable_enterprise_modules=True,
    update_mode=GridUpdateMode.MODEL_CHANGED,
    data_return_mode=DataReturnMode.FILTERED_AND_SORTED,
    height=400,
    fit_columns_on_grid_load=False,
    configure_side_bar=True,
)
Create a download button
Finally, let's add a download button that saves the output to a CSV file:
@st.cache
def convert_df(df):
    # IMPORTANT: Cache the conversion to prevent computation on every rerun
    return df.to_csv().encode("utf-8")

csv = convert_df(df)

st.caption("")

st.download_button(
    label="Download results as CSV",
    data=csv,
    file_name="results.csv",
    mime="text/csv",
)
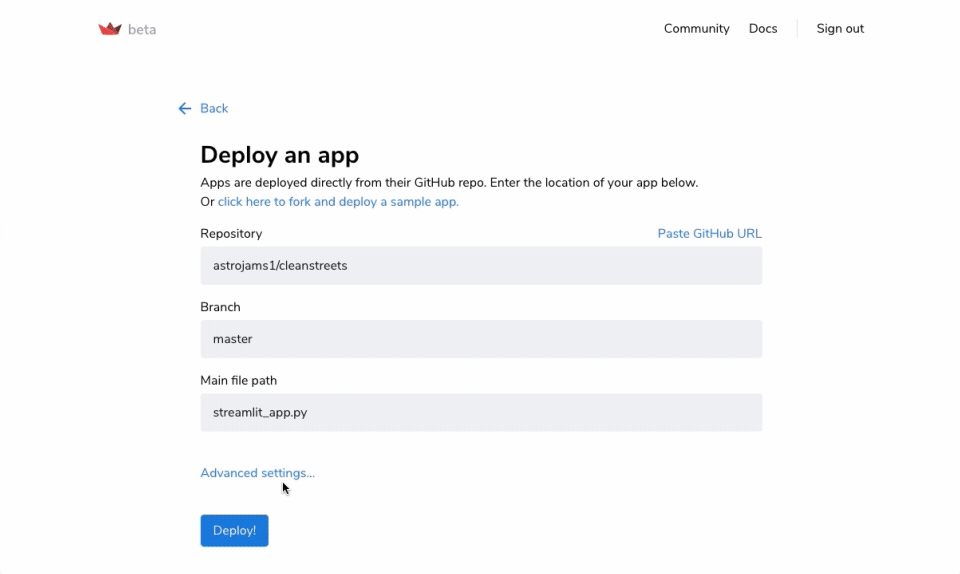
Deploying your app to Streamlit Cloud
Once you're happy with your application, it's time to share it with the world!
You can deploy your app with pretty much anything: Google Cloud, Azure, Heroku, you name it! The easiest and fastest way to deploy it is via Streamlit's native deployment service Streamlit Cloud.
To create a Streamlit Cloud account, go to https://streamlit.io/cloud. It takes under a minute to deploy; you can follow the instructions here.
Some notes:
You'll need to have a GitHub account to Streamlit Cloud.
DO NOT upload your TOML file that contains your API key to Github!
Streamlit Cloud is now fully self serve. No need for invites anymore!
Well done! You've created an accurate zero-shot text classifier in just a few minutes! 🙌
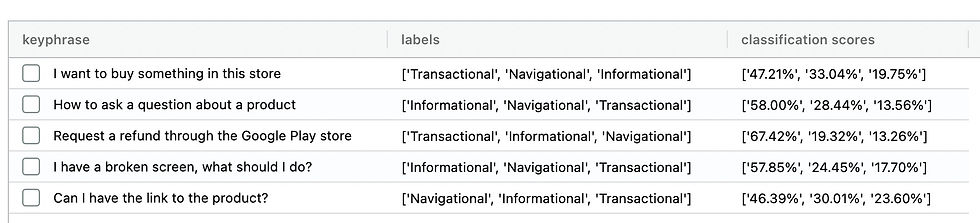
Understanding the classification results
Let's have a look at how classified results:

Keyphrases: Your input phrases
Labels: the labels you have added, sorted by accuracy
Classifications scores: the accuracy scores (in %age) for each of your labels
As always, your feedback is welcome. Let me know if you find any bugs or if you have any suggestions!
Happy Streamliting! 🎈


Love how you combined Hugging Face's zero-shot pipeline with Streamlit's interactivity — the Distilbart model choice makes this super accessible. I've been experimenting with similar approaches using https://ai-3d-modeling.com
Love how you combined Hugging Face's zero-shot pipeline with Streamlit's interactivity — makes it so much easier to test model outputs on the fly. I've been using https://omni-gemini.net
Love seeing zero-shot classification with Distilbart in action via Streamlit — such a clean way to demo Hugging Face inference. I've been experimenting with similar approaches using https://samaudiotool.com
Love how you combined Hugging Face's zero-shot pipeline with Streamlit's interactivity—makes text classification so much more accessible. I've been experimenting with similar setups using https://image-to-stl.com
Great to see a hands-on example combining Hugging Face's inference API with Streamlit. I've been using a similar approach for my own projects and found it really speeds up prototyping. Check out https://facefusion.pro