How to make a speech to text app using Hugging Face and Streamlit!
- Charly Wargnier
- Jan 7, 2022
- 5 min read
This project started as I was hunting for a quality audio transcription app to transcribe audio files. I asked for recommendations on Twitter:
My friend Peri challenged me to build one in Streamlit! I accepted the challenge. My speech transcription app was born! 🙌
In this hands-on tutorial, I'll teach you how to make a speech to text app using using 🤗 @huggingface, @fb_engineering's Wav2vec2 and @streamlit!
🎲 Want to jump right in? Try the app here!

But before we kick off the tutorial, let's talk about HuggingFace API inference.
There are many options and libraries for managing text-to-speech tasks in Python. I've opted for Huggingface's Inference API, mainly because of its lightweightness and ease of use.

Via a simple API call, you get access to 20,000+ state-of-the-art Transformer models.
And although not all text-to-speech models are available via API inference yet, you can still get to try gems like Facebook's Wav2vec2, which is the one that we will use in this tutorial.
Among the other benefits of using HugginFace's API inference, you can run very large models (even ones that exclusively work with GPU) without worrying about RAM or limitations, thus guaranteeing a smooth deployment to production.
Best of all, tapping into Hugging Face API inference is free!
Their free allowance is pretty generous, with up to 30k input characters per month.
Shall you need to go above that 30K limit, you can pick up the Pro plan. And If you need or GPU support, the Lab pan is the one you'd need to try.
See all the details here: https://huggingface.co/pricing.
So head off here to get your API token. We will need it later for our Streamlit app.
And now that preamble is done, let's get started!
Installing a Virtual Environment
Regardless of which package management tool you use, working in a virtual environment is always a good practice. That way, the dependencies pulled in Streamlit (or any other web framework) don't impact any other Python projects you're working on.
Let's create a new Conda environment with Python 3.7, call our environment text_to_speech:
conda create -n text_to_speech python=3.7
Then type the following command, which will activate your Conda environment:
conda activate text_to_speech
Note that you can exit from the Conda environment via the following command:
conda deactivate
We can now manually install the libraries we need for this app to work:
pip install streamlit
pip requests
Importing Streamlit, OS and Requests
After installing Streamlit and Requests into the virtual environment, we need to import both in an empty Python file that we will call streamlit_app.py, as follows:
import streamlit as st
import requests
import os
Adding a title tag, a favicon, and a logo
This can easily be done via st.set_page_config()
Note that the st.set_page_config function must be located a the very top of your Python file, just below the aforementioned imports:
st.set_page_config(
    page_title="Speech-to-Text Transcription App", page_icon="👄", layout="wide"
)
Now let's widen our app layout with this handy CSS hack! Let's set the width to 1200 pixels:
def _max_width_():
    max_width_str = f"max-width: 1200px;"
    st.markdown(
        f"""
    <style>
    .reportview-container .main .block-container{{
        {max_width_str}
    }}
    </style>
    """,
        unsafe_allow_html=True,
    )

_max_width_()
Now let's add a logo at the top of your app via st.image:
st.image("logo.png", width=350)
Adding multi navigation to our app
You can easily add several pages to your app via the st.session_state widget:
def main():
    pages = {
        "👾 Free mode (2MB per API call)": demo,
        "🤗 Full mode": API_key,
    }

    if "page" not in st.session_state:
        st.session_state.update(
            {
                # Default page
                "page": "Home",
            }
        )

    with st.sidebar:
        page = st.radio("Select your mode", tuple(pages.keys()))

    pages[page]()
As you can see, there are two modes in this app:

The Free mode is limited to 2MB of the audio file.
You can switch to full mode to use your own API key and transcribe audio files of up to 30MB.
The code for the Free mode page will need to be wrapped within the Free_mode function, as follows:
def Free_mode():
    # ADD CODE FOR DEMO HERE
Similarly, the code related to the Full mode page will need to be wrapped within the Full_mode function:
def Full_mode():
    # ADD CODE FOR API KEY MODE HERE
Let's have a look at the code snippets we need to add in each of these functions.
Adding a wav file uploader, assessing the wav file's size
First, let's add a file uploader file_uploader:
f = st.file_uploader("", type=[".wav"])
Add a callout containing some wav samples:
st.info(
                f"""
                        👆 Upload a .wav file. Or try a sample: [Wav sample 01](https://github.com/CharlyWargnier/CSVHub/blob/main/Wave_files_demos/Welcome.wav?raw=true) | [Wav sample 02](https://github.com/CharlyWargnier/CSVHub/blob/main/Wave_files_demos/The_National_Park.wav?raw=true)
                        """
            )
Get the file size of the uploaded file:
if f is not None:
        path_in = f.name
        # Get file size from buffer
        # Source: https://stackoverflow.com/a/19079887
        old_file_position = f.tell()
        f.seek(0, os.SEEK_END)
        getsize = f.tell()  # os.path.getsize(path_in)
        f.seek(old_file_position, os.SEEK_SET)
        getsize = round((getsize / 1000000), 1)
        st.caption("The size of this file is: " + str(getsize) + "MB")
Let's set up the following conditional rules for the demo mode:
If the wav file is less than 2MB, then let's allow the API call
If the wav file is greater than 2MB, then we'll trigger an error message, and invite the user to upload its API key to remove the size limitations
if getsize < 2:  # File more than 2MB
    st.success("OK, less than 1 MB")

else:
    st.error("More than 1 MB! Please use your own API")
    st.stop()
Storing your HuggingFace API key via st.secrets
Before we create our API call, we'd need to store our API key anonymously.
Since version 0.78.0, you can manage your secrets in Streamlit Cloud to securely connect to private API keys. data sources etc.

When testing your application locally, you can add your secrets in the "secrets" field using the TOML format. For example:
# Everything in this section will be available as an environment variable

API_TOKEN = "62697577-XXXXXXX-1b3d319fccf4"
You can find out more about secrets management in the Streamlit documentation.
Back to your Streamlit_app.py file, where you can simply declare API_TOKEN in the api_token variable, as follows:
api_token = st.secrets["API_TOKEN"]
Creating your API call to transcribe any wav file to text
Calling the wav2vec model via HuggingFace's API inference can be done in just a few lines, as follows:
headers = {"Authorization": f"Bearer {api_token}"}
API_URL = "https://api-inference.huggingface.co/models/facebook/wav2vec2-base-960h"

def query(data):
    response = requests.request("POST", API_URL, headers=headers, data=data)
    return json.loads(response.content.decode("utf-8"))

data = query(bytes_data)
By default, the text transcribed from the audio file is nested in a Python dictionary. We need to extract the corresponding dictionary value and lowercase the fonts, as by default the text output is capitalised
We also would want to print the output to your Streamlit app.
You can do so via the snippet of code below:
data = query(bytes_data)

# Extract the dictionary values

values_view = data.values()
value_iterator = iter(values_view)
text_value = next(value_iterator)

# Convert all cases to lowercase

text_value = text_value.lower()

# Print the output to your Streamlit app

st.success(text_value)
Finally, let's add a download button that saves the output to a text file:
st.download_button(
    "Download the transcription",
    text_value,
    file_name=None,
    mime=None,
    key=None,
    help=None,
    on_click=None,
    args=None,
    kwargs=None,
)
Note that the code snippets for the Full mode page are similar to the code snippets I shared above, The only difference is that you will need to add a text_input field so users can add their own API token, as follows:

Deploying your app to Streamlit Cloud
Once you're happy with your application, it's time to share it with the world!
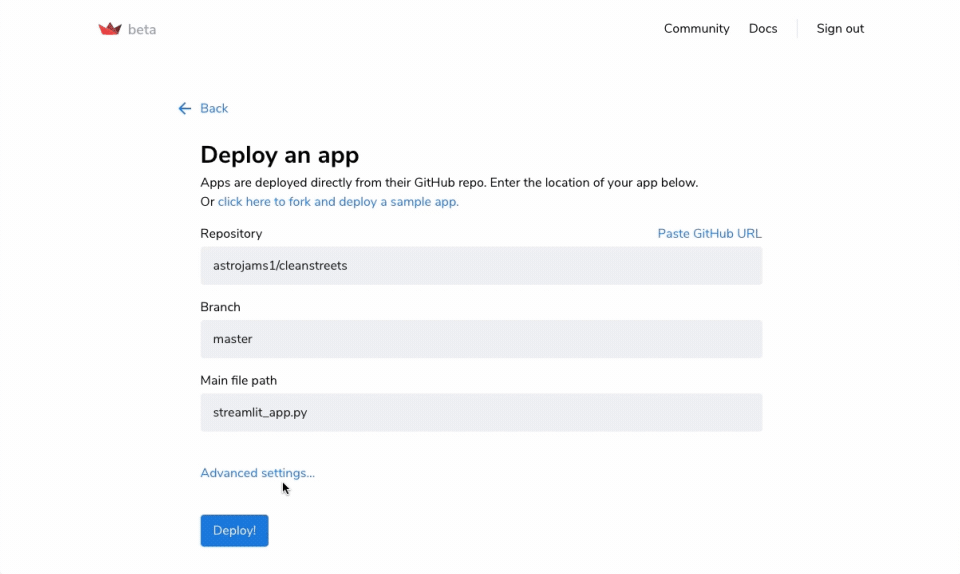
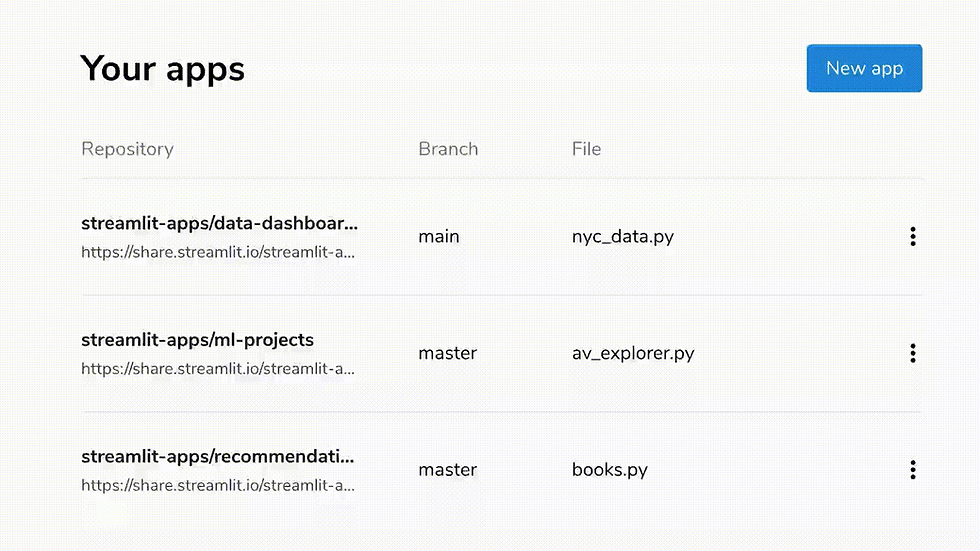
You can deploy your app with pretty much anything: Google Cloud, Azure, Heroku, you name it! That being said, the easiest and fastest way to deploy it via Streamlit's native deployment service Streamlit Cloud.

To create a Streamlit Cloud account, go to https://streamlit.io/cloud. It takes under a minute to deploy; you can follow the instructions here.
Some notes:
You'll need to have a GitHub account in order Streamlit Cloud
DO NOT upload your TOML file that contains your API key to Github!
Streamlit Cloud and is now fully self serve. No need for invites anymore!
That's it! The app repository with all the code is available publicly here.
As always, your feedback is welcome. Let me know if you find any bugs or if you have any suggestions!
Happy Streamliting! 🎈


Все началось в маленьком городке, где я живу уже тридцать лет. Работал я менеджером в местном магазине бытовой техники, зарплата — едва хватало на жизнь. Каждый день один и тот же маршрут: дом-работа-дом. По вечерам смотрел телевизор или листал соцсети, пока однажды мой старый друг детства не позвал меня на рыбалку. Сидим мы с удочками, разговариваем о жизни, и он невзначай говорит: "А я вот вчера пятьдесят тысяч выиграл, просто сидя дома". Я сначала не поверил, конечно. Все эти истории про выигрыши казались мне сказками для лохов. Но когда он показал скриншоты с реальными выплатами, во мне что-то щелкнуло.
Первые две недели были сплошным разочарованием. Я регистрировался на разных сайтах, которые находил через поисковик. То деньги пропадали непонятно куда, то…
Generator-energy.ru — это надёжный источник информации о современных генераторах и энергосистемах. Здесь вы найдёте обзоры, характеристики и советы по выбору оборудования для дома, дачи или бизнеса.
Neue Spieler werden auf https://slotuna.de/ mit attraktiven Willkommensboni begrüßt, darunter Freispiele und Einzahlungsboni. Stammspieler profitieren von laufenden Aktionen und VIP-Prämien.
TypeType offers a wide variety of app fonts, each designed with the specific needs of mobile and web applications in mind. Whether you’re developing a sophisticated enterprise solution or a fun, user-friendly mobile app, TypeType provides the perfect typography to enhance your app’s design. Their app fonts are optimized for clarity, scalability, and easy integration across different platforms, ensuring your app looks fantastic on any screen.
Hi Charly nice app! Did you think about recording audio instead of uploading files? I am working on an app that does speech-to-text https://github.com/gustavz/jaivus , but unfortunately streamlit is only able to capture system audio, which does not help for a deployed app. Do you know of a library that can be used together with streamlit to capture client side / browser audio?